But Gizzy is nice and toasty (and absolutely adorable!)
via Crocheting in Georgia
Showing posts with label Crafts. Show all posts
Showing posts with label Crafts. Show all posts
Baby, it's cold outside!


Saved in the Nick of Time
 My good friend John is always finding treasures for me. He knows the Powell River back country better than anyone. I never know what it will be, but here are some of the most memorable treasures he's brought home:
- An old manual typewriter
- An old logging two-man crosscut saw
- An oil can and tea kettle
- An old-time fire extinguisher
- Lots of pretty rocks
- Lots of interesting driftwood
- Rusted chains and tools
 One treasure came from a "dump" along the shore. The contents probably came from old homesteads. Amid the trash he found a cast iron goose. It had one leg and was rusted, but John knew it was a perfect treasure to bring home for me. Besides, it didn't take much space on his quad.
My goose has a prominent perch in the kitchen, but has continued to deteriorate. I decided it was time to do something about it.
 And it was a good thing I did. When I moved him, half of the head fell off and by the time I got it to the picnic table, the other half went too. I whittled a stick to fit into the neck and glued the head back together with some Amazing Goop. I also used the Goop to seal the edges of the cast iron halves and sealed the surface with several coats of polyurethane. While I was at it, I made a bark brace for his missing leg. Now Mr. Goose should last for years to come.
Thanks John for all the treasures. You're a great friend. -- Margy
Repurposed Watering Bottle
 Yesterday you read about how I repurposed a BBQ to become a planter for my cabin porch. Last year I wrote about about repurposing other items in Use It, Don't Lose It. I told about how I used a plastic pancake syrup bottle as a "watering can" for my sprouting seeds. It works really well because you can really control the amount of water by how hard you squeeze.
 But after I made my planter so spiffy, I thought my watering can needed a facelift. I have acrylic paints at the cabin for craft projects, so I used some to paint a new "face" on the bottle. First came a white base coat over the old labels, then a picture on the front. To keep it from getting damaged out in the weather, I sprayed it with several coats of clear polyurethane. Now it is a useful and decorative part of my new planter. -- Margy
Repurposed BBQ Planter
 I found a great blog this week. It's called Renewables At Home and focuses on ways to "reduce the impact your lifestyle has on the environment." One article that caught my eye was Two More R's: Refuse and Repurpose. It talks about the importance of finding new purposes for items that are broken or worn out. I did just that with an old BBQ at the cabin.
 I've been wanting a potting stand and planter to put under my kitchen window. I designed one to build from wood, but when our BBQ was damaged during a winter wind storm (see Flipping Burgers), it gave me a new idea. Rather than throw it away, I decided to clean it up to be my "new" planter.
To make it a look less like a BBQ, I removed the side shelf, burner, knobs and lid. The legs and sides were in pretty good shape, but the bottom self was very rusty. I used some leftover RustOleum paint we had to cover up the labels on the front panel and resurface the self.

 The back panel proclaiming "Master Chef" became "Master Gardener" with a garden bunny mascot. I wanted plastic trays to fit on the shelf and inside the top to hold my seedlings and plants. I found litter boxes on sale at Canadian Tire for $4 on sale that were the perfect size. That made the total cost of my planter remodel $8.
 The planter looks pretty good. Yes, I know, it still looks a bit like a BBQ, but it makes me feel good to know I gave a new purpose to something that would have otherwise taken up space for years to come in the dump.
Have you repurposed anything lately? I'd love to hear what you've done. -- Margy
Bunny's Back
 In Spring 2003 when my floating garden was new, Wayne got me a garden mascot - an Easter Bunny. Since then, Bunny has faithfully guarded my flowers and veggies, and brightened my garden in all seasons. By 2008, he lost most of his colour. The sun can be pretty harsh you know. Then, this last winter during a windy storm, he cracked into several pieces. But Wayne and I didn't want to give up on Bunny. Together we brought him back to life.
 Wayne found a cedar shingle in our wood pile. He outlined Bunny and used his new jigsaw to cut out the pattern. Then he used waterproof glue to piece Bunny back together on his new wood backing. You can see how cracked and faded he was.
  Next I used acrylic paints to give Bunny back his colourful countenance. His "backside" is plain white with a puffy cotton tail. His front used the same outlines as before and I just coloured by the numbers so to speak.
 When Bunny was restored front and back, I sealed him with four coats of clear polyurethane. Since he will be standing in the garden fall, winter, spring and summer, I felt he needed a "heavy coat." That will make Bunny ready for anything the weather can dish out.
 Welcome back Bunny! We've missed your smiling face and faithful service. May you stand guard over my garden for many years to come. -- Margy
DIY Bird Mobile
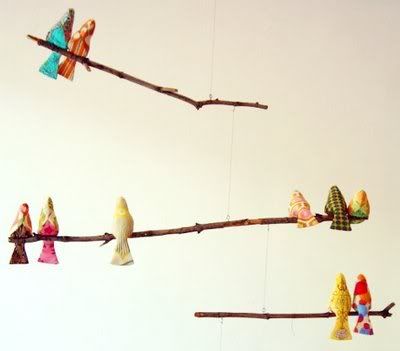
(via [bb-blog])

Waldorf Baby Bunnies
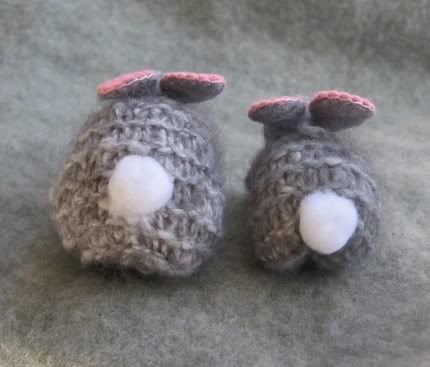
They are stuffed with clean wool and have embroidered wool felt ears. Completely handmade,this sweet set is so soft and fluffy. They would make a wonderful gift for the child, spinner or bunny lover on your list. These are traditional Waldorf style bunnies made completely of natural fibers, great for a nature table or doll play.
At Etsy by fairiesnest.
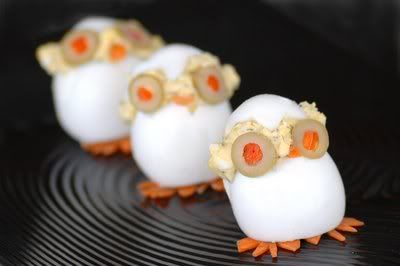
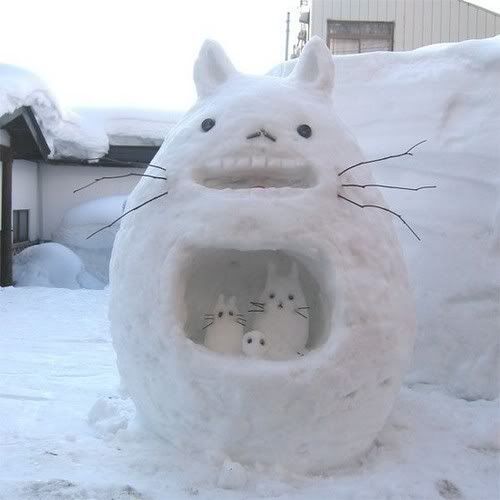
Hungry?
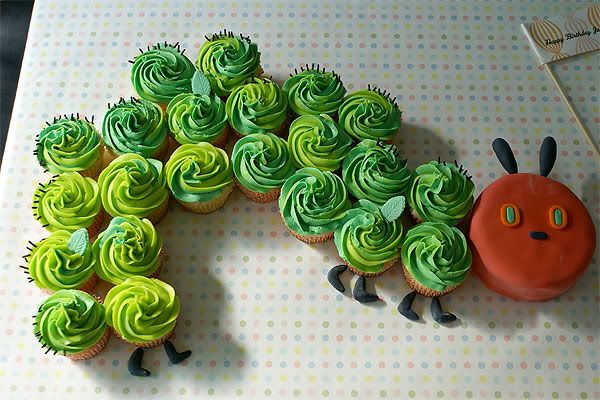
(via The Daily What)
As cute as a sock monkey?
Might be cuter than a sock monkey ...
Please note that no penguins were harmed in the creation of this project, however, some socks were severely damaged in the prototyping stage. Please do not use socks that still contain feet.
Note that hot glue guns can burn you. They're called "hot" for a reason. Do not let 6 year olds operate hot glue guns. Adult supervision is required. Also, do not let 6 year olds operate heavy machinery. It's just a bad plan.
(via Penguins!)
Do it yourself - Cat Chaise
Go see Evil Mad Scientist Laboratories on complete instructions to make this lovely chaise for your favorite kitty.
All you need are big sheets of cardboard, a hot glue gun, markers, scissors and/or a hobby knife, and a cutting mat or other surface where you can safely cut.

Latch Hook Cabin Rug
 I like to work on crafts while I'm at the cabin. I just finished a latch hook rug using yarn. It's hard to find pre-cut rug yarn, but it is available online from Herrschners for Canadian and US customers. You can sometimes find canvas and latch hooks in craft stores.
There are kits available, but I like to create a design of my own. My most recent rug was of my favourite place on earth, my cabin. Here's how I made my latch hook yarn rug.
- I cut the canvas mesh to size with a little extra for a hem. Mesh comes in two sizes, 3.75 and 5 holes per inch. I use the 3.75. At four rows per inch, each yarn package will cover a section of about three by five inches.
- Be sure to order enough yarn because it comes in die lots. Each package contains 320 strands of machine-washable acrylic yarn that is pre-cut to 6cm (2-1/2") long.
- Using a black permanent marker, I drew my design on the canvas. Don't worry, it doesn't show through.

- I like to work my designs by section. That way I can see how it is developing.
- Within a section, for example the trees, I count squares to create the detail. That's easier than drawing the detail on the canvas mesh.
- As the design grew, I did go back and make some changes. For example, I didn't like the way the water looked, so I took it out and reworked it with a different colour.

- I trimmed the edges of the canvas to one inch, turned it back and hand stitched one-inch binding tape over the edges.


Birth of a Whale
 The Vancouver Aquarium was recently excited to announce the birth of a baby beluga whale on Tuesday, June 10. The new baby named Qila entered the world on live video for the world to watch. The Aquarium continues to have a live feed from the whales' tank so you can watch all the action.
 In my post yesterday, I announced the "birth" of a whale of a different kind. The "birthing" process began with an empty propane tank that floated into Hole in the Wall. It was discovered by our good friend John. After a year without any claimants, he agreed to give it to us. It was extremely rusted, especially below the water line. Wayne's first task was to sand the entire tank to get rid of the loose rust particles and blisters.
 The next step was to prepare the metal surface for painting. Fortunately, we found a half-priced can of metal primer at the local Rona store. They have a great section if "mistints" to choose from. Because we wanted to protect the entire tank from further corrosion, Wayne had to roll it over and tie it up to get at the bottom.
 The next step was to paint the entire tank with a white base coat of rust-resistant paint. Because we had the primer underneath, no rust have leaked through. Once the white coat was dry, it was time to decide what to paint on the tank. We had several ideas: a submarine with waving passengers, a salmon, and even Ogopogo, the monster of deep lakes. The winning design was a fanciful whale.
 Again using rust-resistent paint, Wayne coloured in the design until the form of the whale emerged. Painting while the tank was in the water was a little problematic, and periodic rains didn't help either. The left and right sides aren't exact duplicates, but that adds to the character of our whale.
 Our newly "born" whale is now part of the boom in front of our cabin. He performs two important tasks. First, he welcomes passerbys to the Hole with a great big grin. Second, he helps cut down the wakes from their boats so that we can keep welcoming smiles on our faces as well.
We plan to let our new whale swim in the Hole all summer. Next year, he may go through a reincarnation and come out with a different look. Who knows, that sub may yet surface in the Hole. -- Margy
Subscribe to:
Posts (Atom)


